I heard that you could make buttons out of the pits of avocados from my friend Bee, and I wanted to figure out how to do it! So, I checked a guide and winged it from there. Basically, you want to:
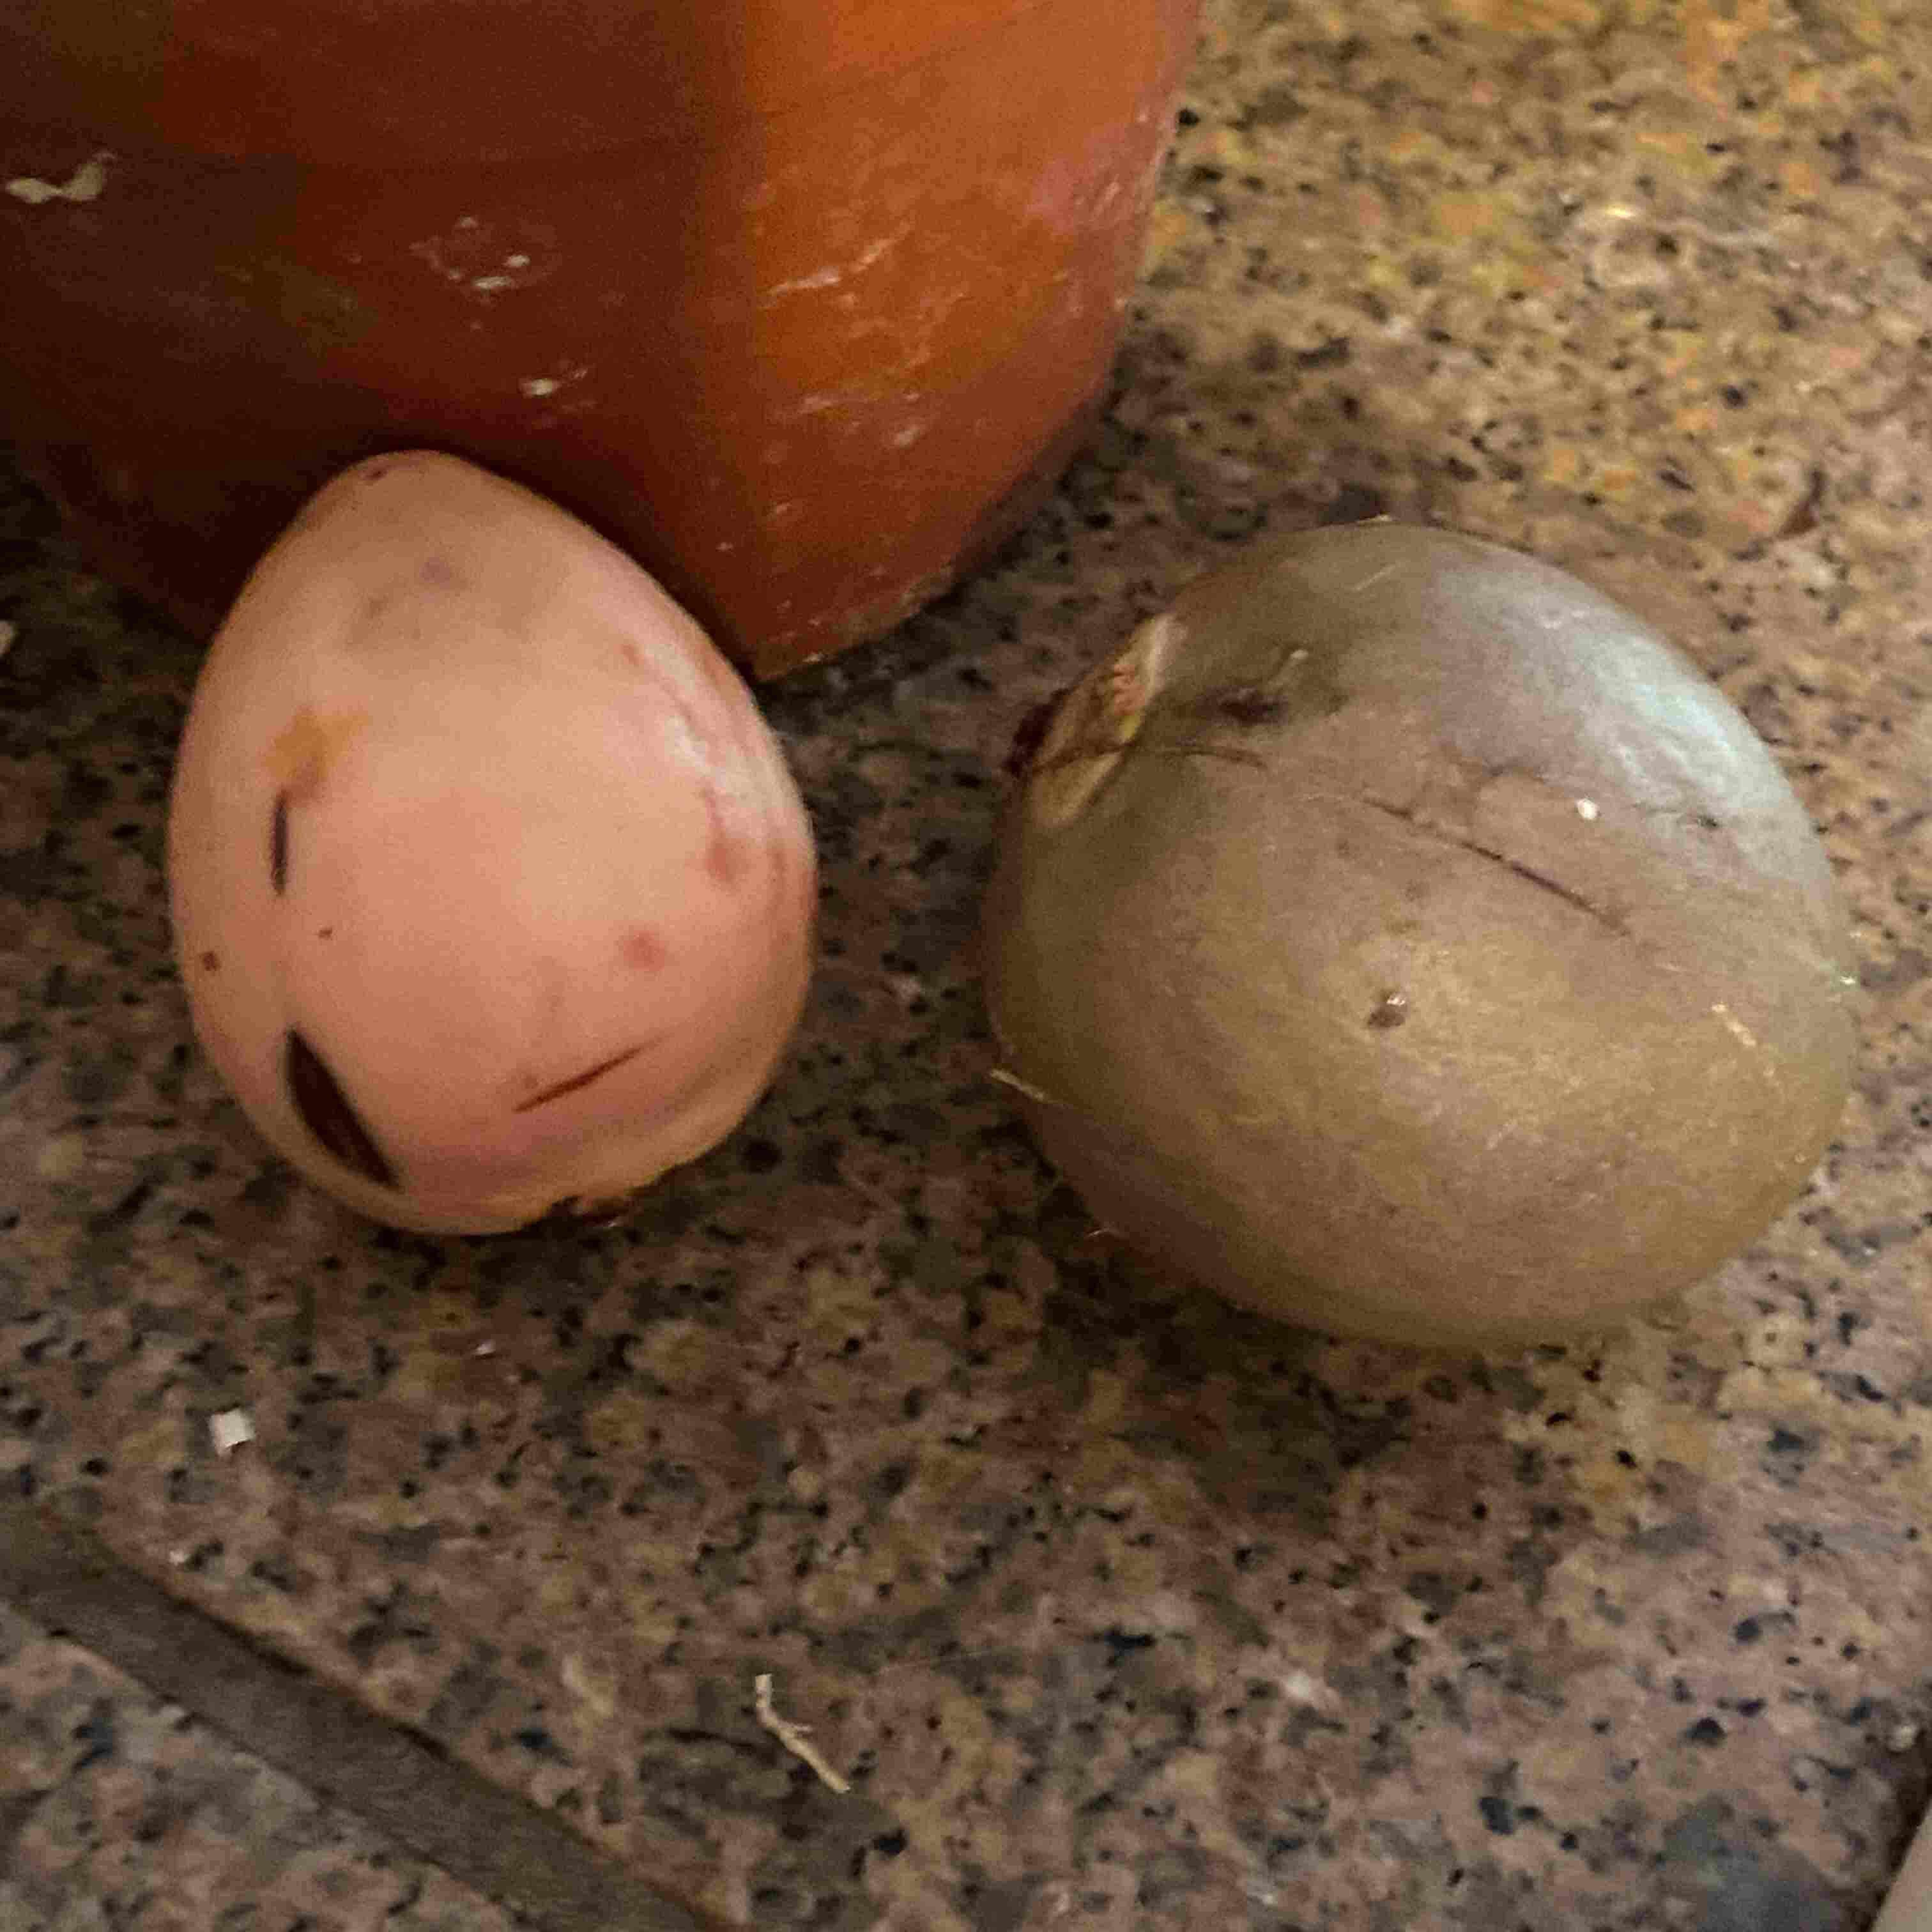
1. Leave your avocado pits out for at least a couple days, until the outer layer of its shell comes off like a hard-boiled eggshell. The picture is a pit before (right) and after (left) having this skin peeled.
2. Then, cut the pit--with a cutting board--into 3-4 slices depending on how big it is, so that you have flat layers to now:
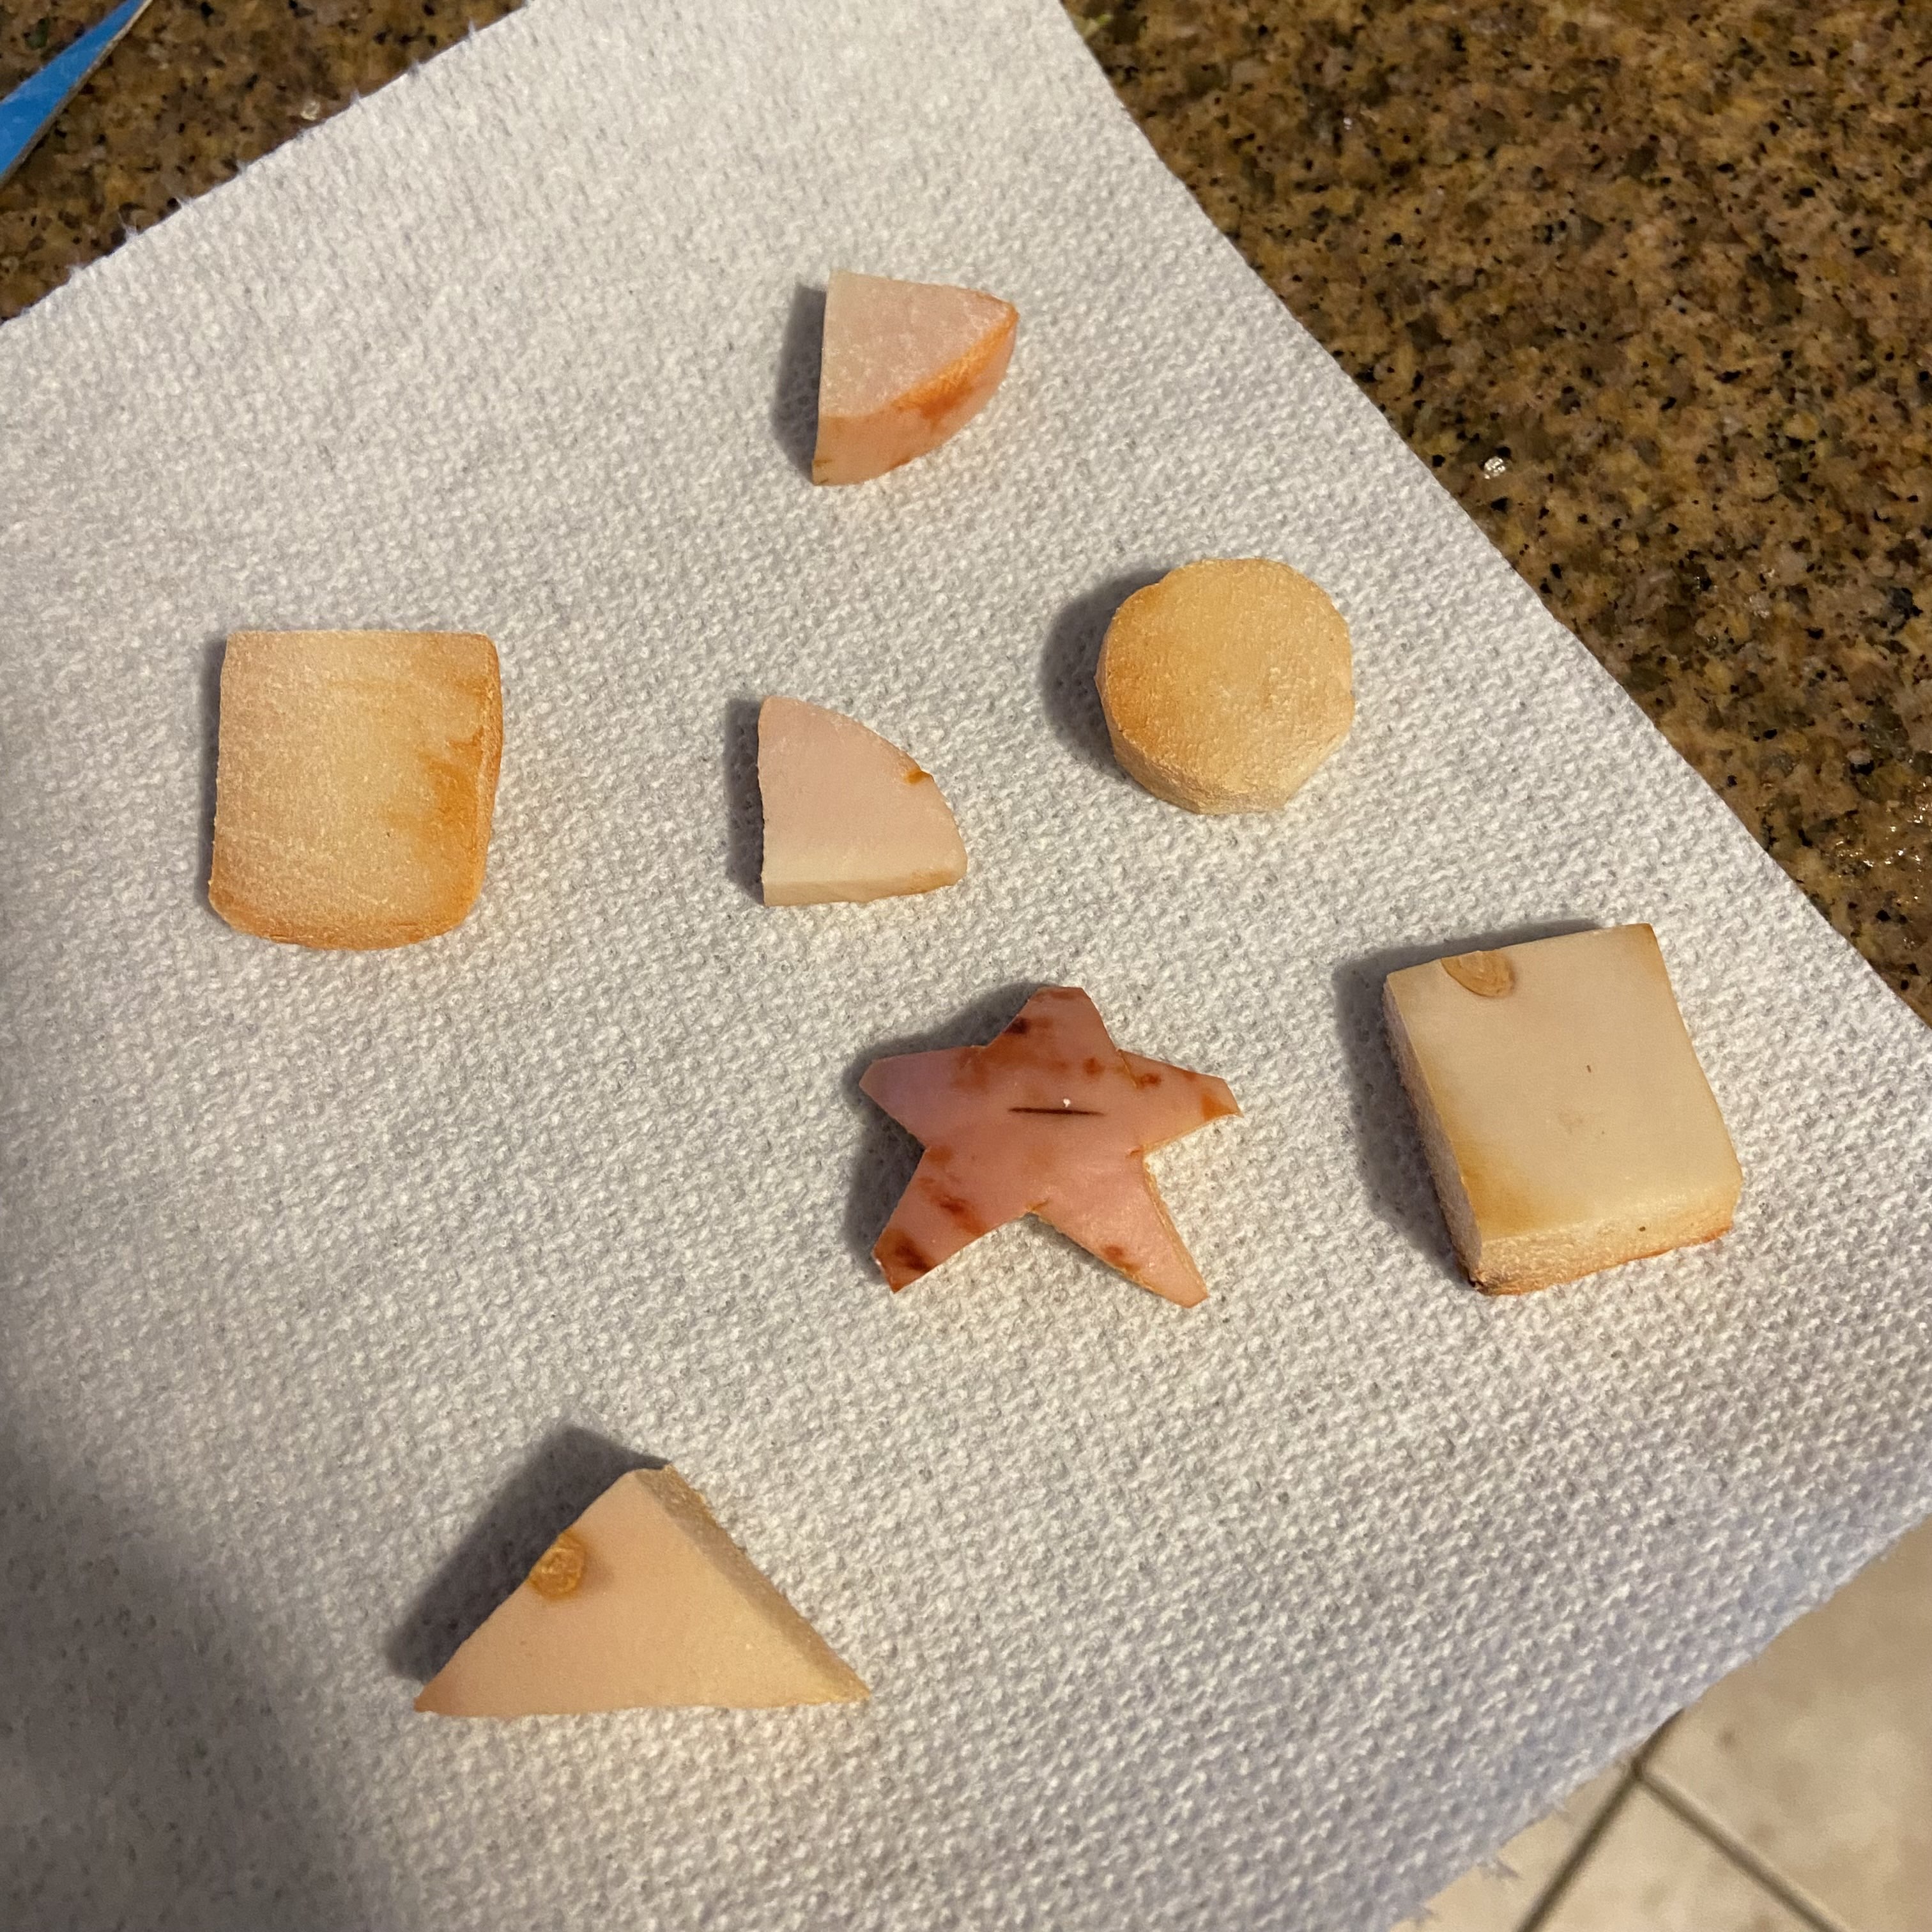
3. Cut the layers into your button shapes. You can make whatever shape buttons you want, and I tried for a ton of different ones to see what would work and look cute.
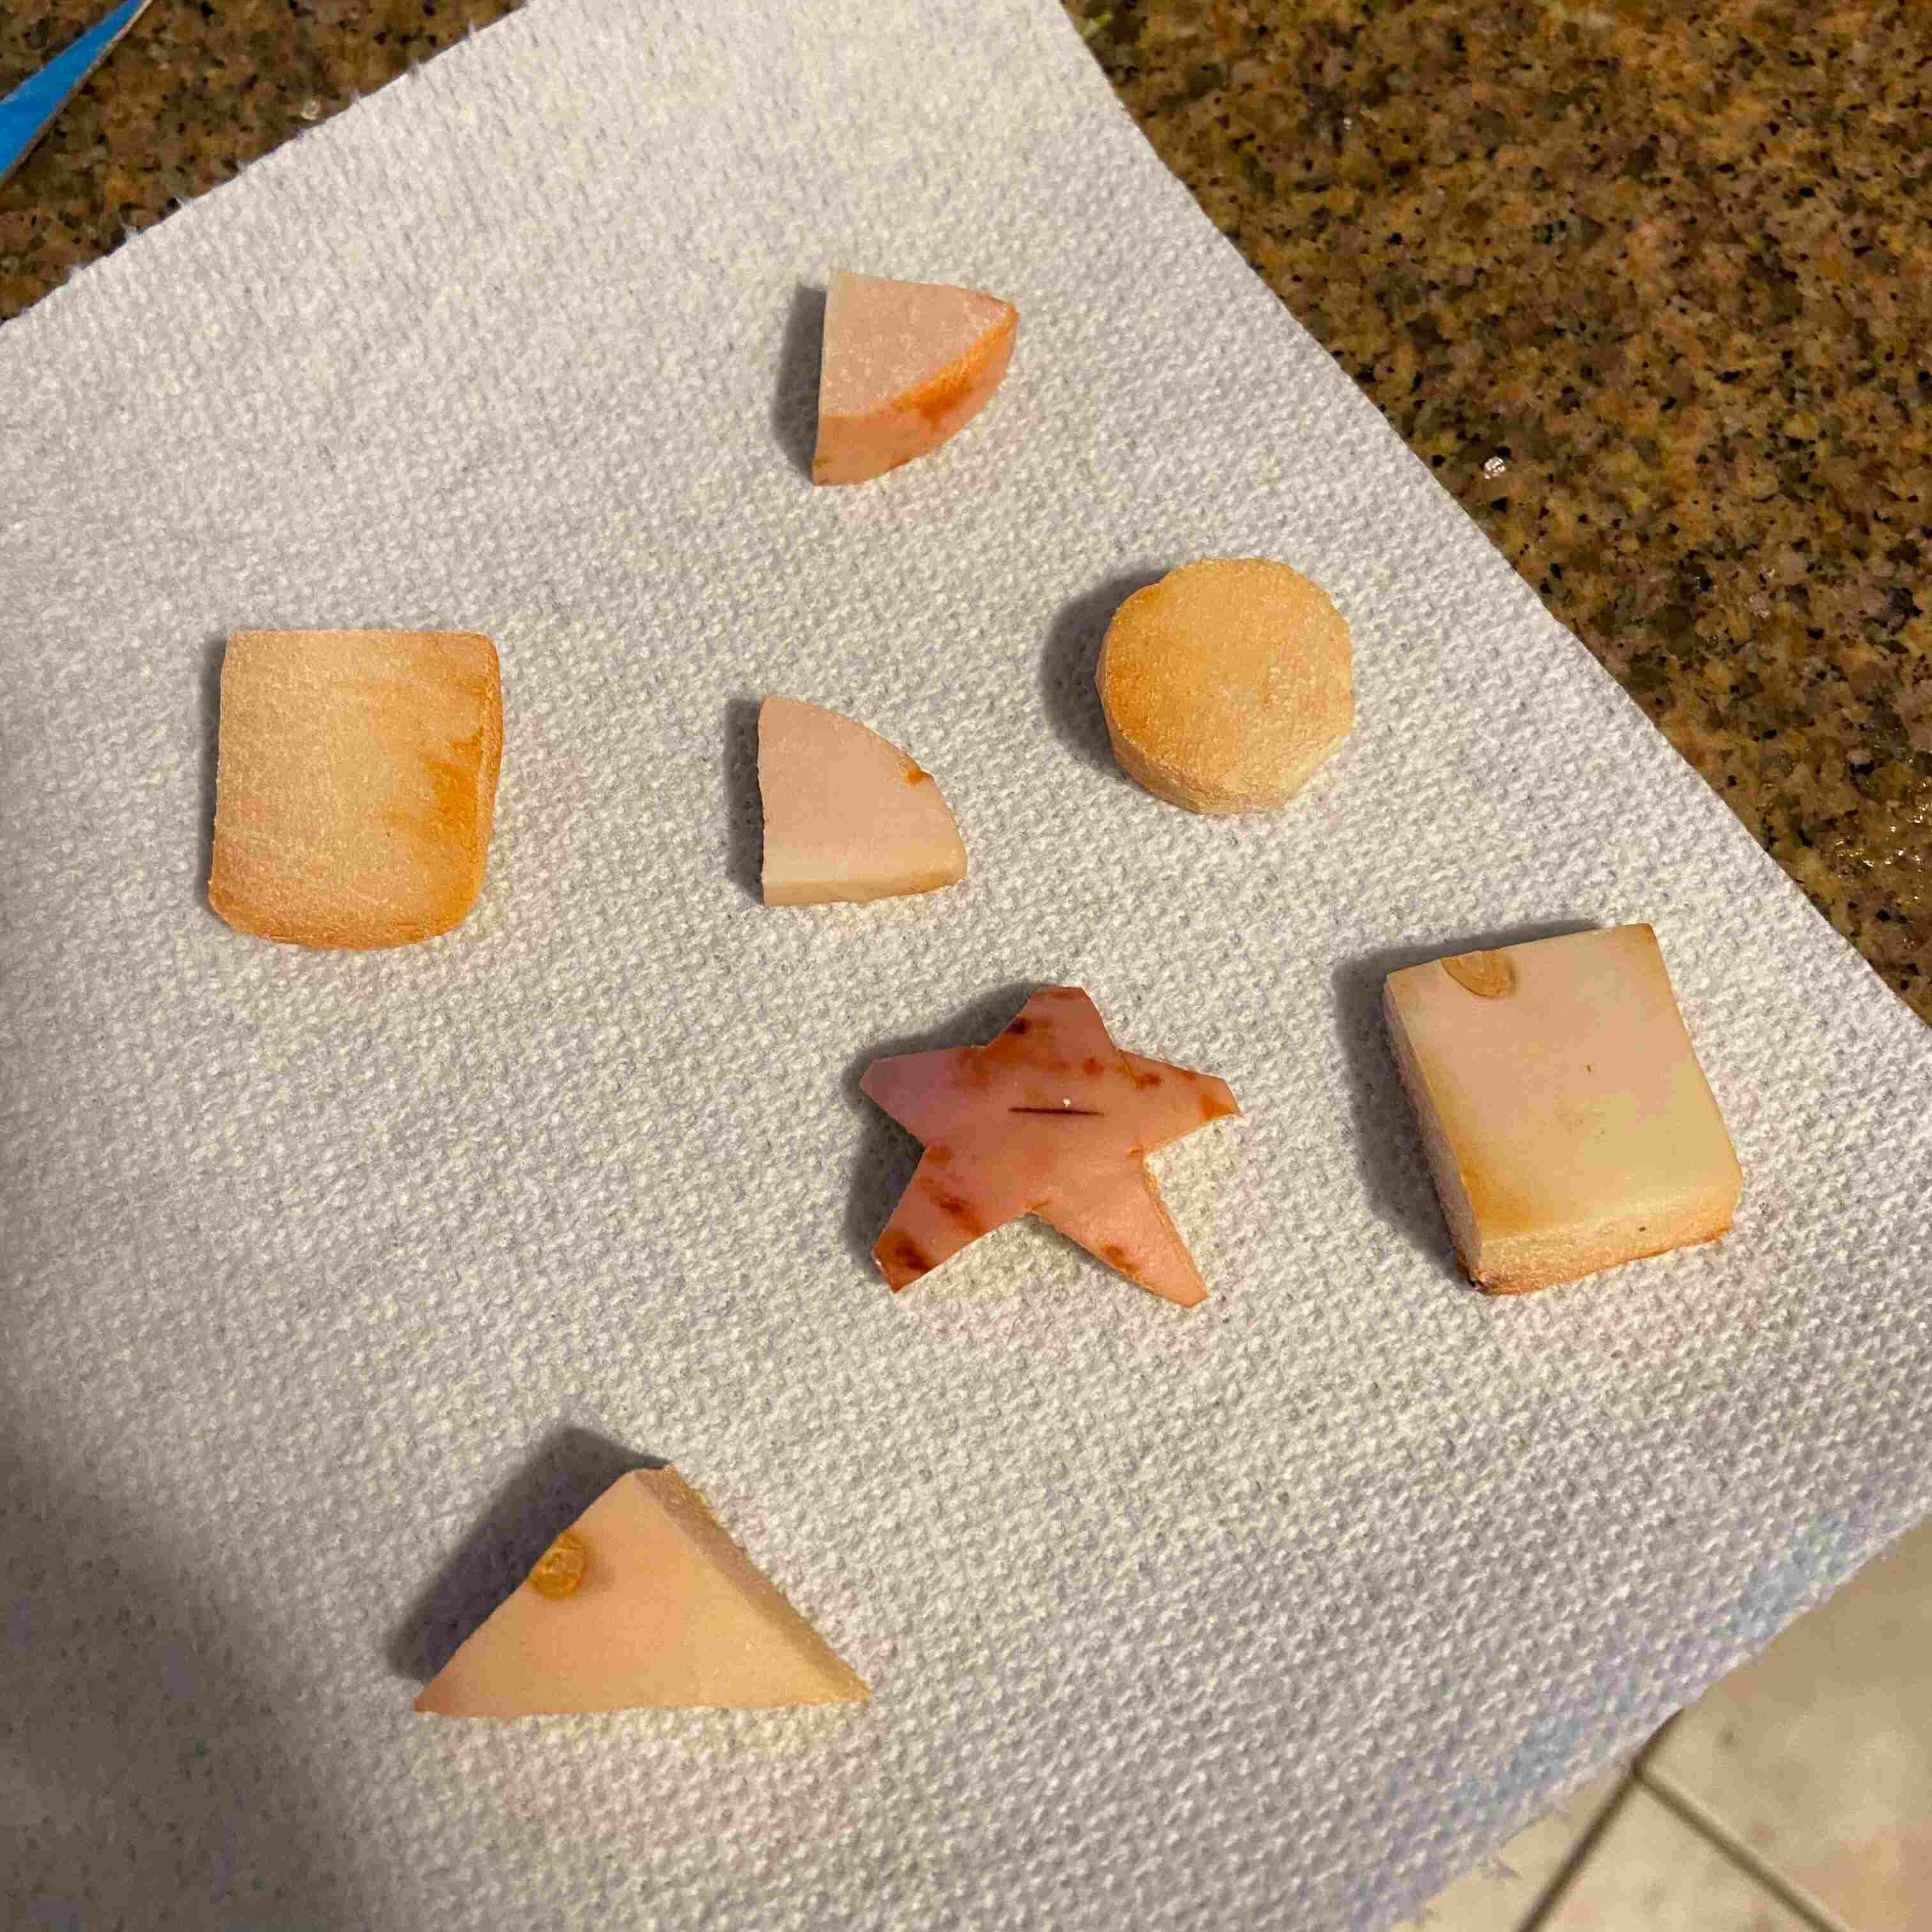
4. Now, drill holes through your buttons with an automatic drill or just use a toothpick/any skinny thing that will make a hole about button-hole size. Whatever size will work so long as enough of the pit is in tact to keep it structurally sound. Unfortunately, I drilled my holes after the next step instead of right now, so you'll see what happens to some of mine later...
But! For now, you will:
5. Place your buttons on a paper towel and fold it over them. Then,
6. Take them outside or into the most naturally hot area you have access to (luckily Phoenix is about the best place I could be for this :3) and place the covered buttons in the sunlight, placing something heavy on top of them to help squeeze out moisture and keep them from flying away.
7. Leave them drying for a while (for me, about 2-3 days seems to be perfect, but its very hot and dry where I live, so test out the appropriate length for you) and then uncover your buttons and revel in their dehydrated glory!

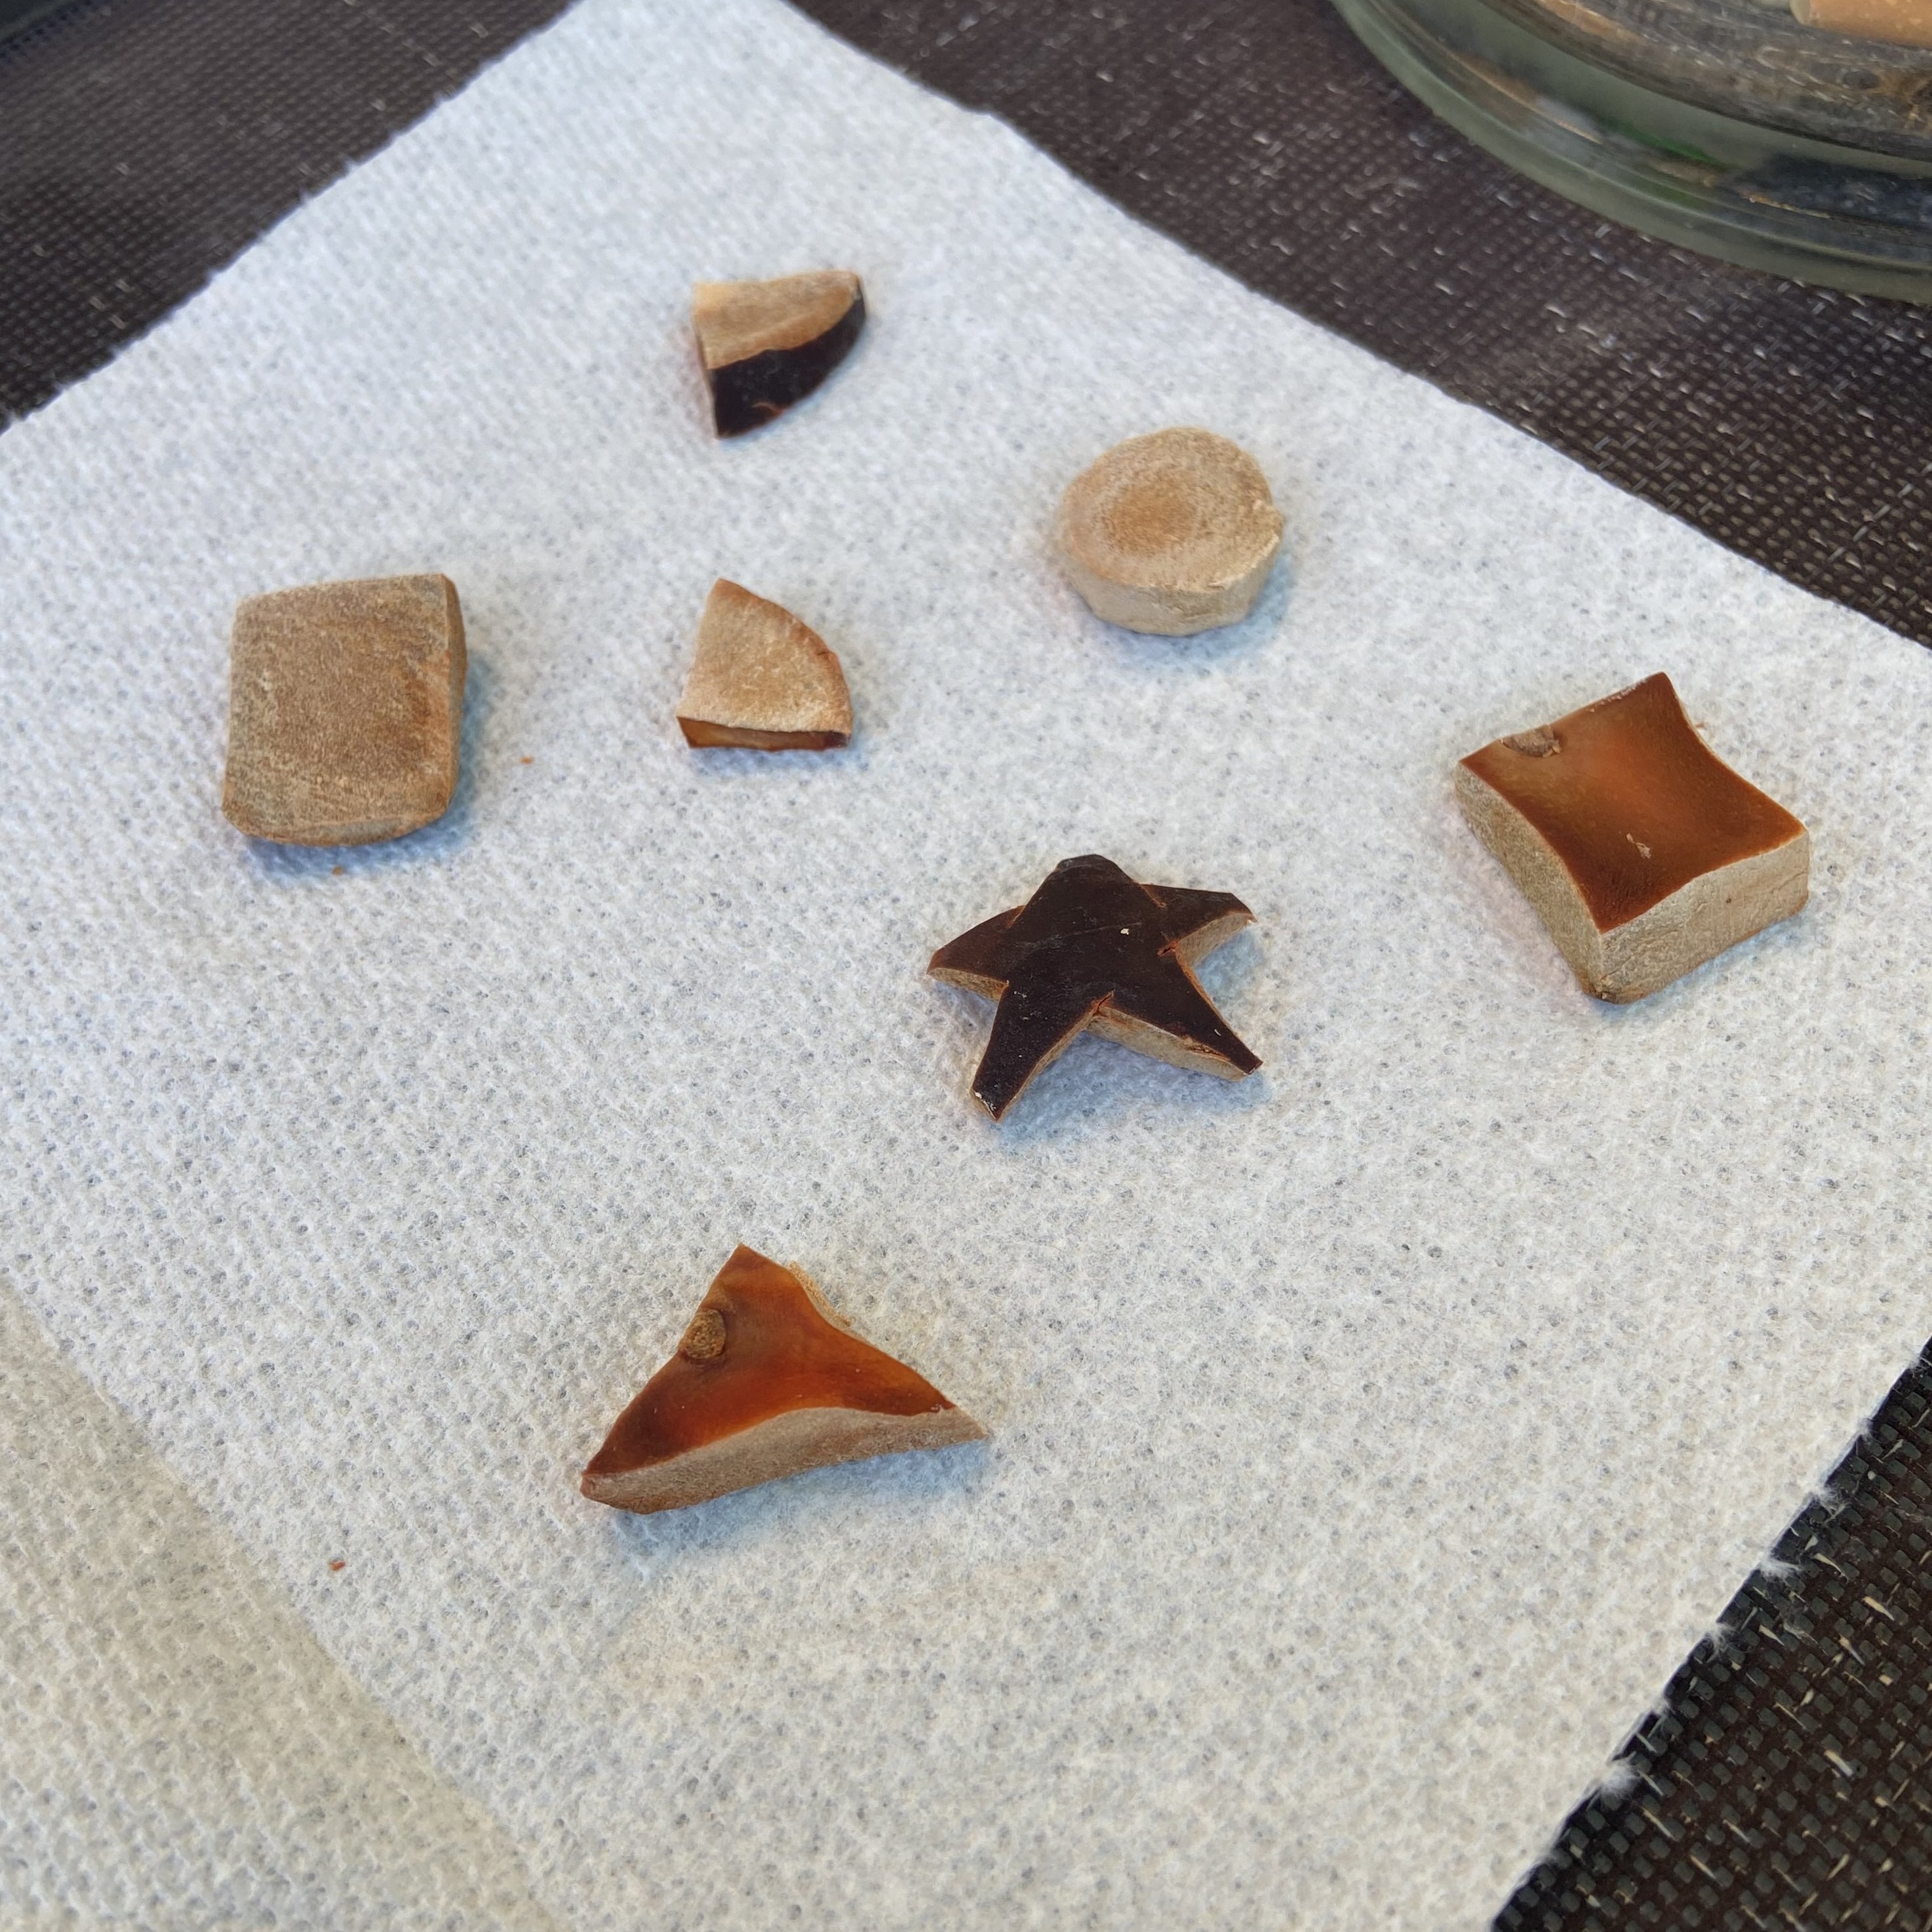
Now, here you can see I drilled my holes after dehydrating the buttons, which was a BAD idea, since they're of course much more brittle after they've been dried out, so 3 out of my 7 buttons cracked and broke..
 But regardless, it turned out pretty well!! From here,
8. You should paint them in a wood gloss or primer-type paint to make them look much nicer and shinier, but I don't have any of that, so I'm finished here! I plan to make many more now that I know to drill before drying them, and I also want to paint them fun colors and designs! If you followed this tutorial, feel free to show me your buttons by signing the guestbook or emailing me :D!
Making a Katamari Cosplay -- 23' Aug. 26
today, i will be making a katamari damacy cosplay of the fabled, lovely, dashing prince :D
this is also my first post,, i’m figuring things out as i gooooou (that applies in general T-T)
First: i went on the arduous journey to select my cousin of choice; between ichigo, dipp, and the prince, i chose the latter of the latter!
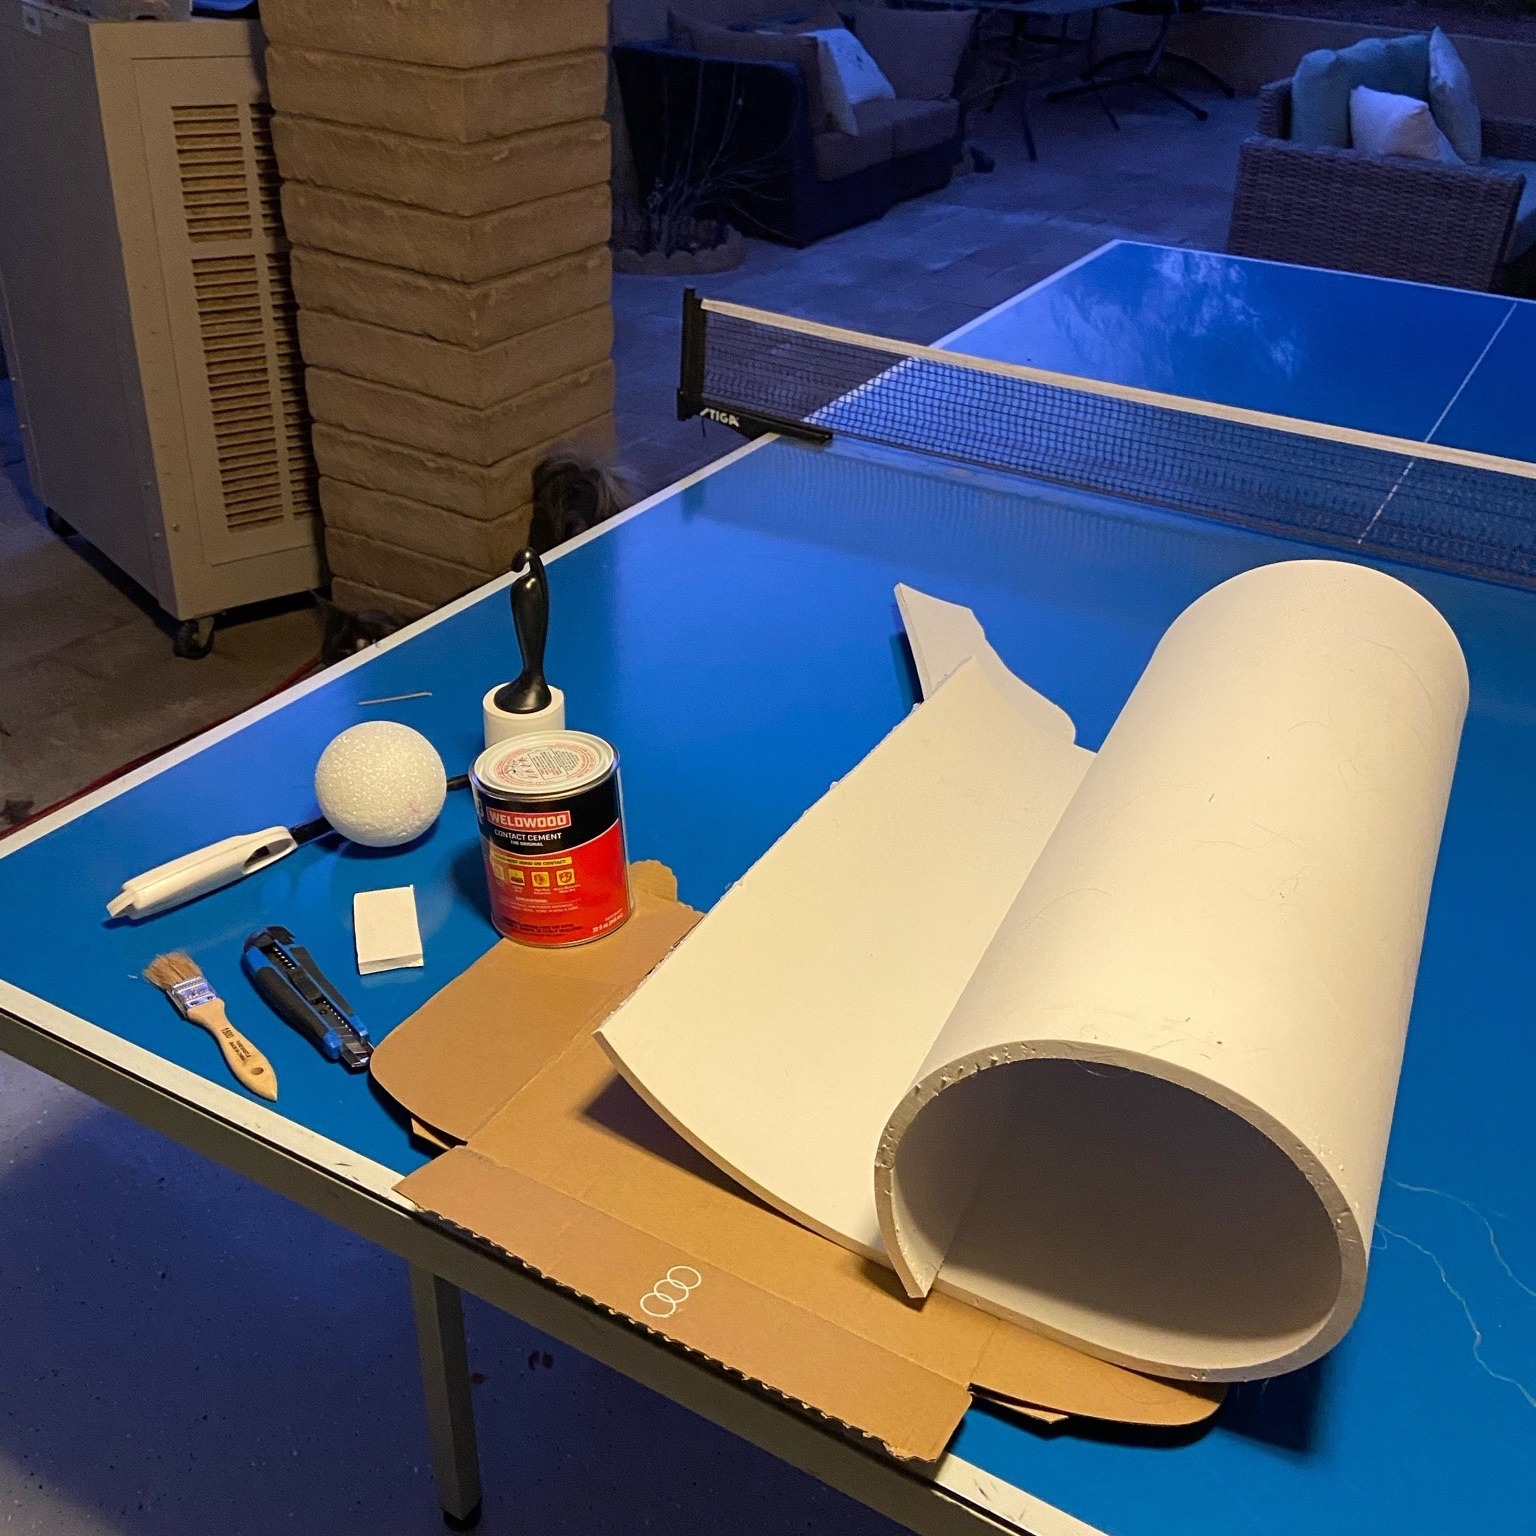
Then! i conveniently had eva foam of the perfect size (62x90cm for the main head tube!) in my garage (also I didn’t mention this, but this is in preparation for Saboten in september :} which.. is a week from now ;´∀`)
After trying to hot glue the foam, I realize this will not work very well! and set out making a shopping list of: contact cement, a squeeze bottle (for said cement!), more eva foam for the round ends of the head, fabric (which required some lovely geometry throwbacks!!) and more to come. this will surely be only one trip of many.. o_O
—>—>—>—>—>—>—>—>—>—>
updateee: it has now been three hours since i set on this journey.. i’ve made a pit stop at mcdizzles for some quick and deceptively yummy brain “fuel” (i’m gonna eat a salad later for my own sake ..) and after applying my newly acquired contact concrete to the tube, i will be on my merry little way to Joann’s for fabric! :3 (future edit: i no longer support mcdonalds!! anyways lawl)
—>—>—>—>—>—>—>—>—>—>
update: six.. hours.. and I have collected (crossing my fingers) every material required for the prince’s head!! the person at home depot had to help me buy the contact cement, because you can’t get it if you’re under 18?!?! —soo he just put in his birthday hehe— see below for my new workbench, as the contact cement is realll stinky and couldn’t be done in my room -_- (but then again, the 100 degree phoenix weather truly helps it feel like i’m hard at work!)
 —>—>—>—>—>—>—>—>—>—>
successfully contact cemented the foam together! not perfecto, but much better (and actually sticky..) than the hot glue attempt ٩(ü)ว
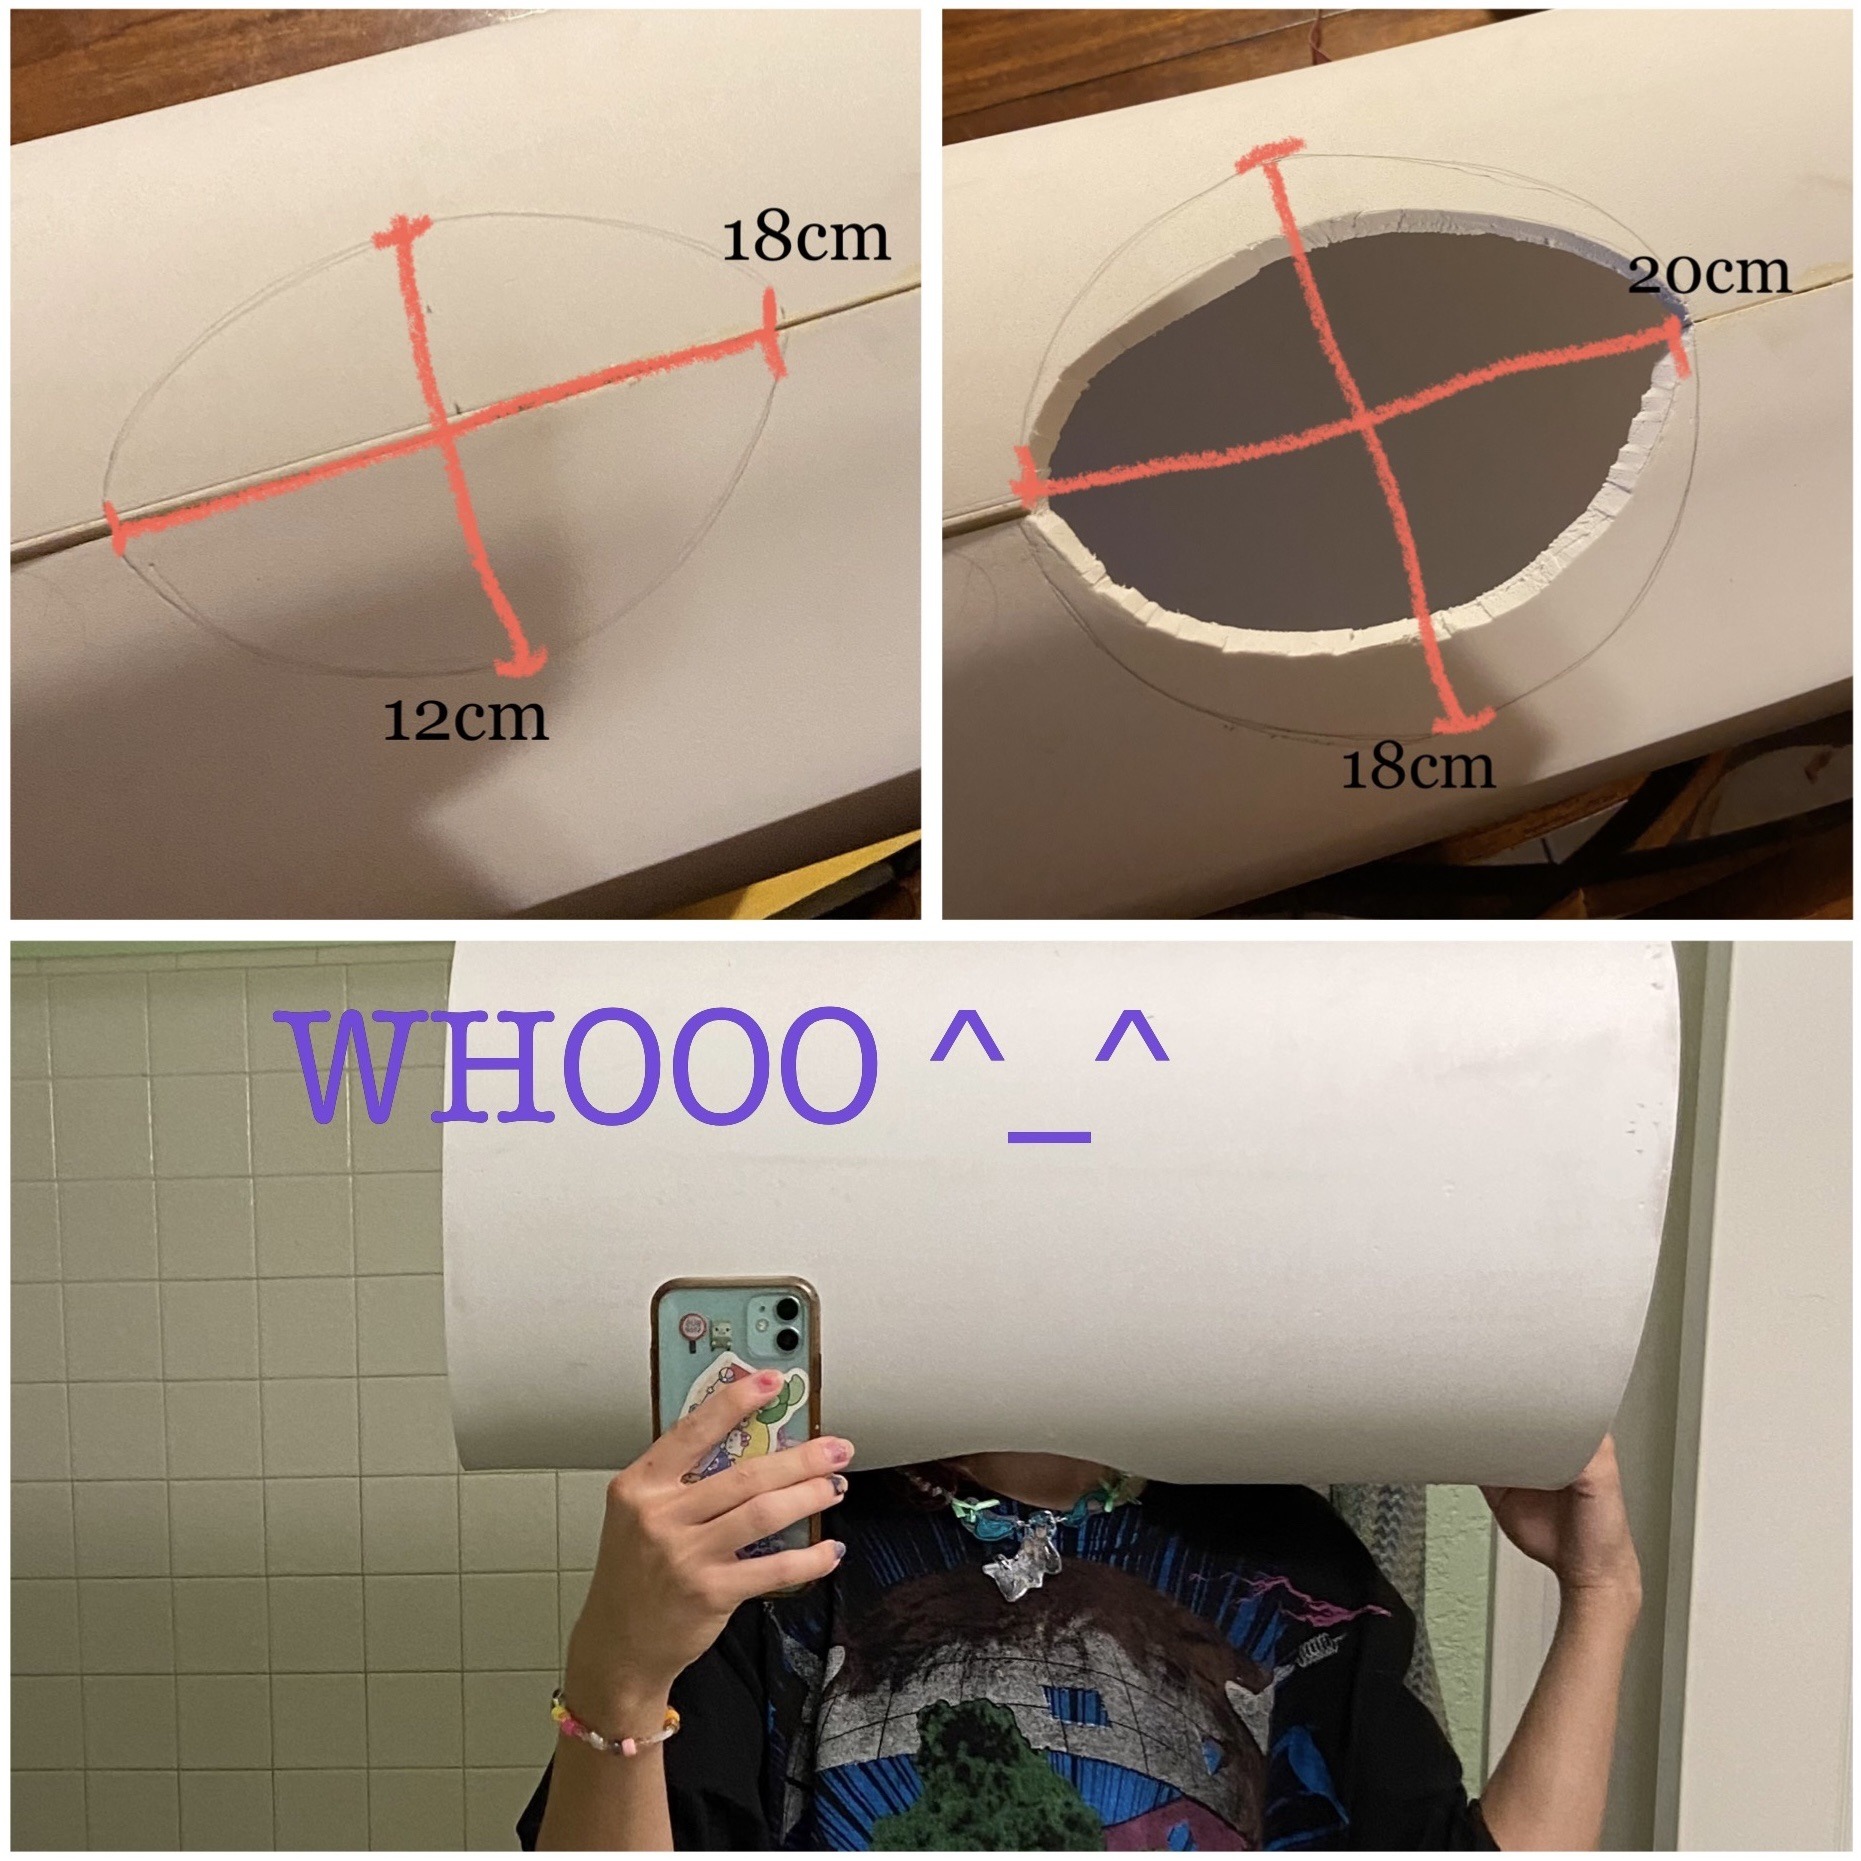
now.. head hole :o
the first was not big enof, and my initial measurement was based on someone else’s lovely blog on, of course, the same subject. now then *drum roll* the first equipping!!!
after this big win, i set up the base green fabric on my cleaned ping-pong (it was reeally dusty before) and strategized how to apply the fabric to the foam. The lady who cut my fabric in Joann’s told me that compact cement would proburby show through the fabric, and after doing some test patches, hot glue also did that, soo i decided to use spray adhesive, which worked wonderfully!! this part is easier with someone else (i had my dad help me :3) but not necessary. picture is before and after!

you can seeee there’s some wrinkles, however! most of the wrinkles are on the part above the head hole (that indented circle area near the bottom left), which is where the prince’s face will be, so the wrinkles will be covered! and the rest of the sides look really good and wrinkle free :D and next, i sprayed the inside of the edges with adhesive and tucked them in *ding big smile and double thumbs up*
nareator: they go inside… cuete kitty break..

BOOOMM excellent performance kitty you did magnificent 10/10
—>—>—>—>—>—>—>—>—>—>
you will not believe what i have just accomplished

WHOO antenna done!!! it was actually really easy to do too! first i wrapped the cloth around the cone and cut the extra off the bottom (leaving ~1/2 inch extra to tuck under), and then unrolled it to see what shape the fabric was for funzies.. thennn i spray adhesive’d the fabric and re-rolled (pun intended YEAHH) the cone onto it and tucked the bottom and top. i also needed a tiny extra scrap which you can see in the bottom middle picture, but that was pretty easy and not super visible :] I put a toothpick into the top so that i can attach the ball later (once i figure out how to make it red..)
and for now.. i sleep while watching doogal, a dumb movie i would quite recommend. exzcellente
—>—>—>—>—>—>—>—>—>—>
i’m awake! i make eggs for me and my family and we have a lovely family morning and go to play DDR after! neoww back to the project at hand(s)..
—>—>—>—>—>—>—>—>—>—>
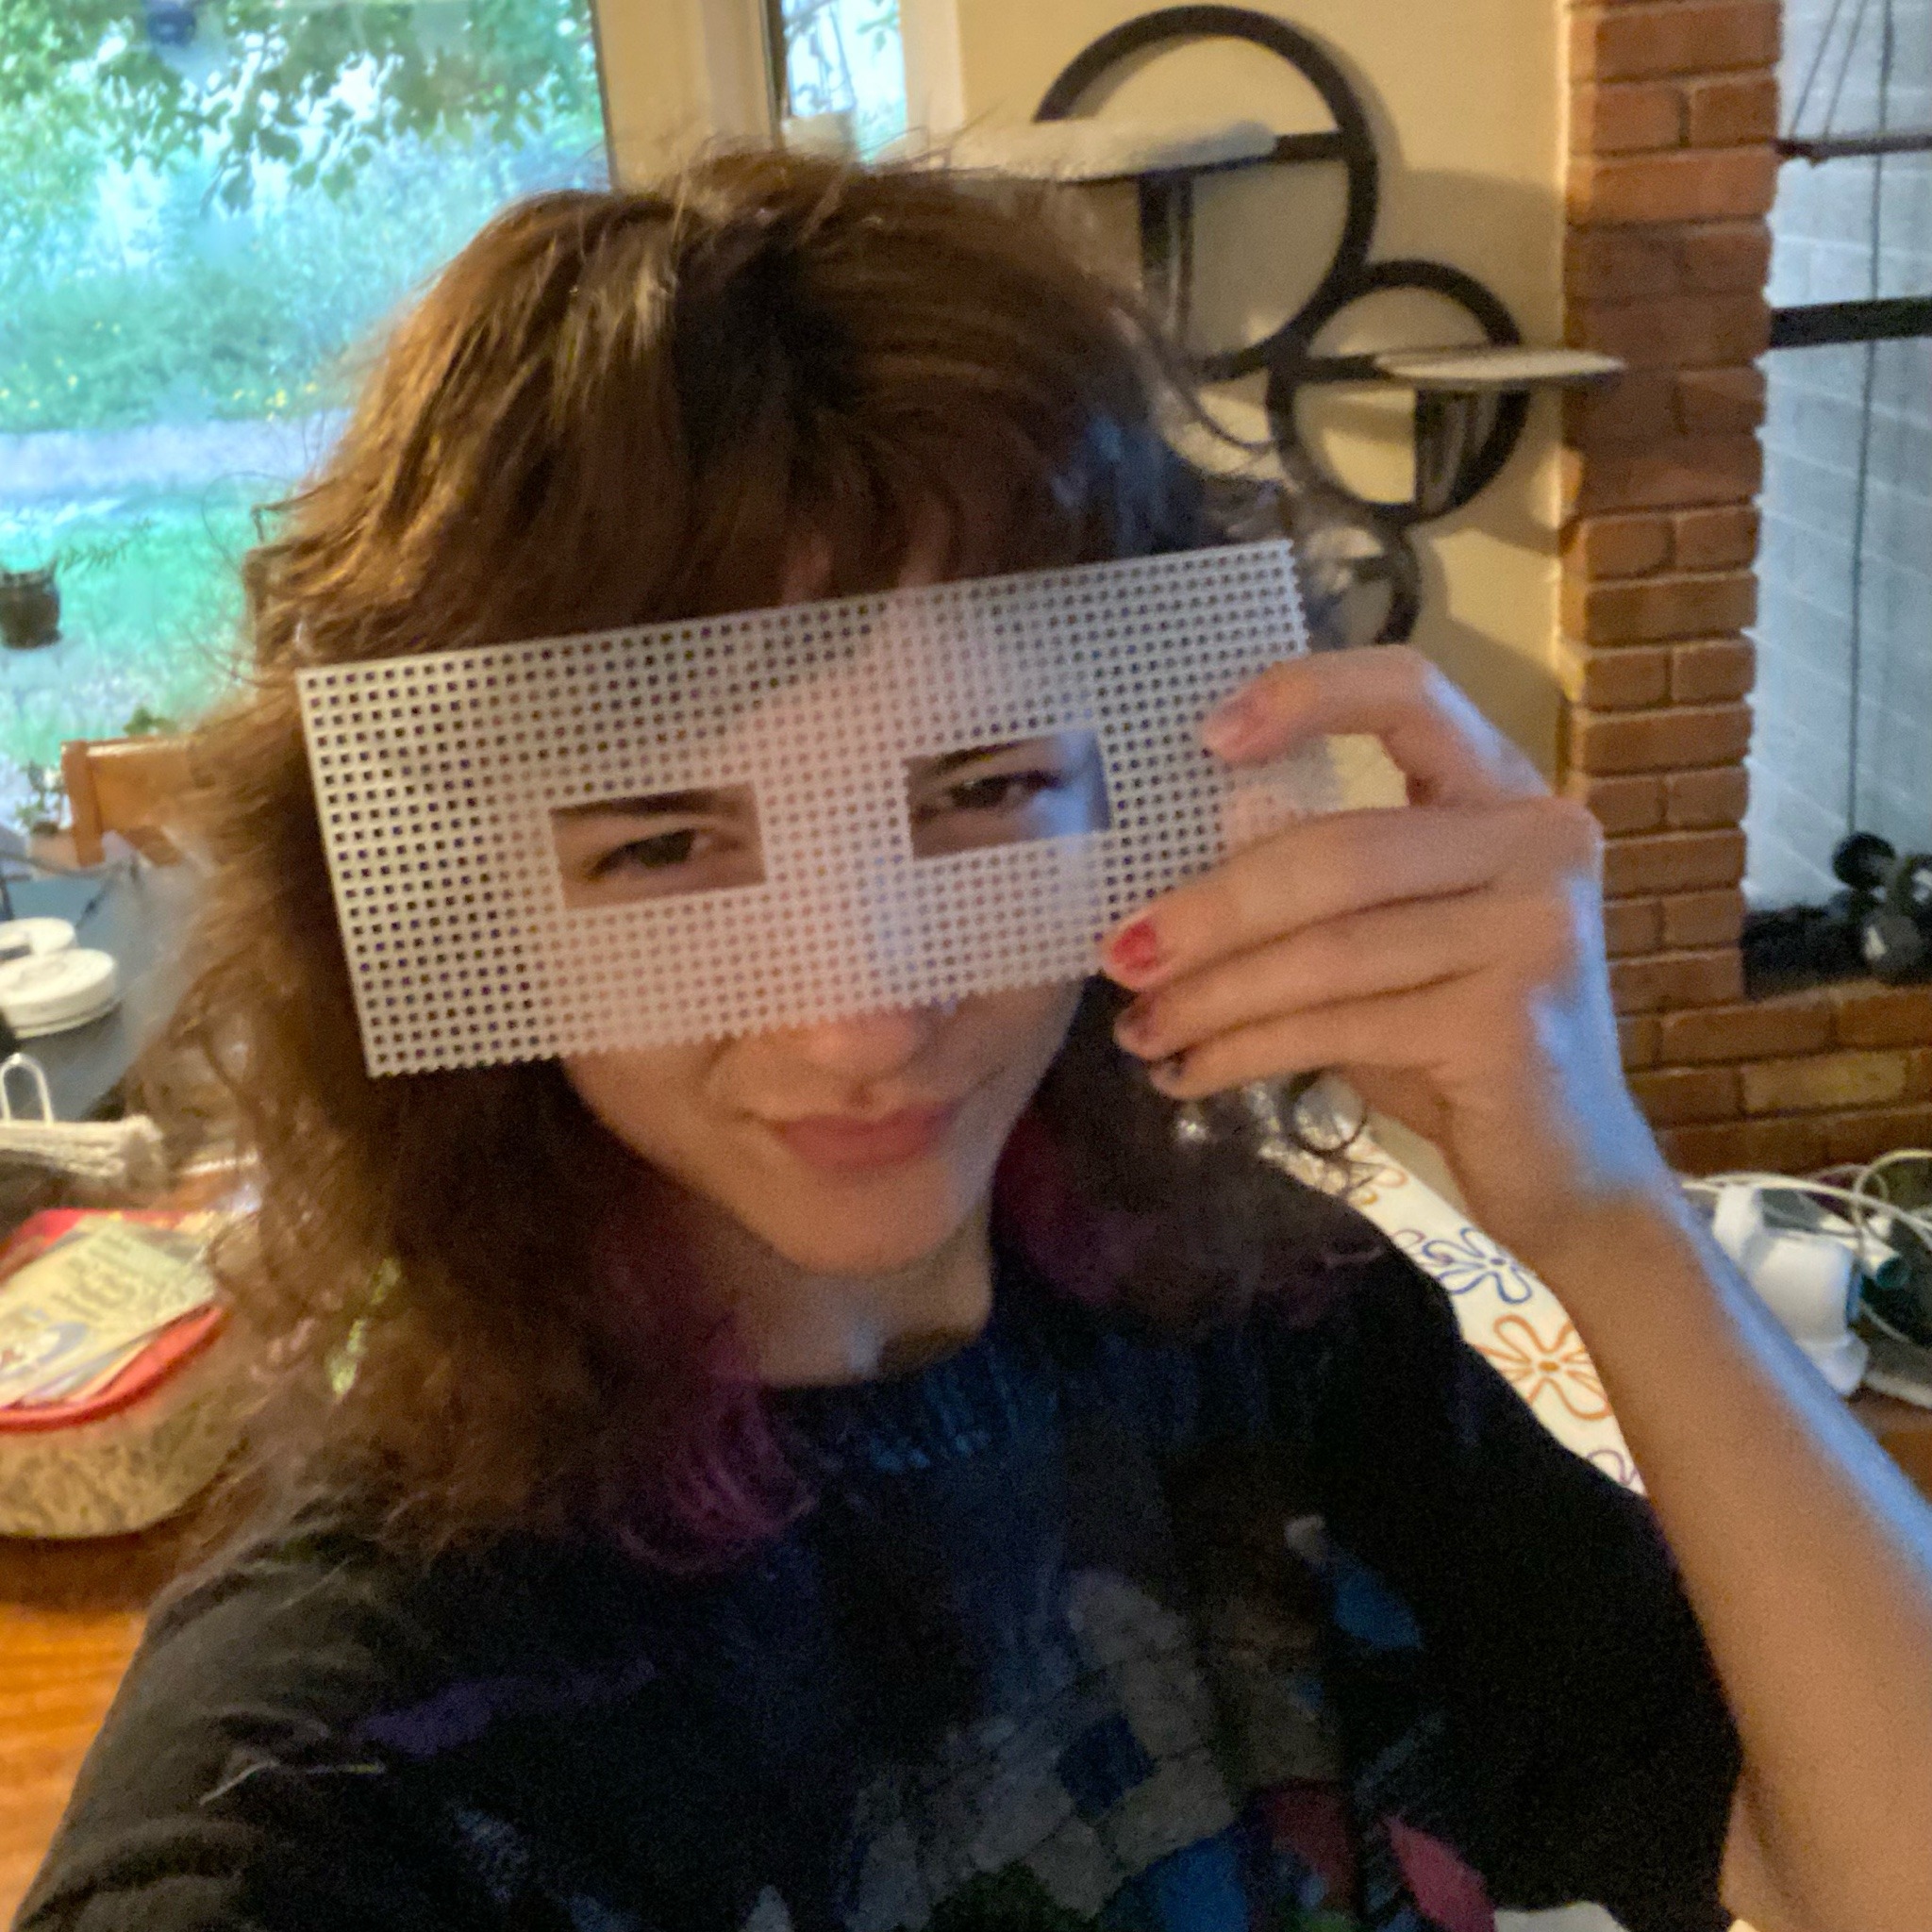
üpdate: i got a heat gun so hopefully i can create the rounded end caps for the head.. but now i am recruiting my brother to cut a straight ribbon of light green fabric for the head since i’m left handed in a right handed world and can’t use scissors well.. but! meanwhile i have made a plastic mesh eyehole cover with some cutouts to see easier!! it’s 10x20cm (easy, right?!) and here’s a picture i actually really like of me modeling it :D
—>—>—>—>—>—>—>—>—>—>
after an absolutely insane amount of trial and error and math and mentally blowing up.. i have realize that you can’t make a half sphere with a circle. you need.. gores!! any amount will do, typically 12 but i’m gonna do 4 to make it easier. i found a website to find the dimensions of these four gores to cut my foam into to make two half spheres (in my case, a 30cm diameter half sphere needs four 12x46cm gores). now that i have the numbers.. down to business.
—>—>—>—>—>—>—>—>—>—>
well i’ve done it.. kinda..

i cut out the 8, and glued four and four together to make two half spheres. BUT my brother told me i should cut them at a 45° angle so they connect better but he was wrong, so now my half spheres are very weird and not actually half spheres.. i’ll work with it!
next: face! i get silky see through fabric and leftover yellow from my noggin cone and get to biz. i needed two layers of my silky fabric cause it was (and still kinda is) see through, but manageable! i also tragically had to re-do the eye mask thang cause it wasn’t the right size and wasn’t centered, and needed to basically upholster the whole face (it was.. a process). i thennn cut out and colored pieces of card stock as the face and put them on!! UMM it’s looking reallyy good, idk what i expected but this is lovely! and all my mistakes so far have been learning opportunities so i don’t mind :3 update pictures ↓

—>—>—>—>—>—>—>—>—>—>
i come to accept that with the way they are, the half spheres will simply not work (ㅠ_ㅠ) and so, i practice some real-time ingenuity and go to goodwill, buy the cheapest pillow i can, take its stuffing out and hand sew twooo shoddy side cushions to stuff into the ends! (also i reposition the prince’s face a little.. much better now.)
—>—>—>—>—>—>—>—>—>—>
through another stroke of somehow-working-ingenuity™, i attach the cone and ball to the head by sticking a (sharpened!!) pencil up through the inside of the head and up into the bottom of the cone. it works brilliantly! (though i doo get a little scared that it’ll slide all the way through the head and just fall off since it’s got no base to hold it from sliding out.. but don’t worry it didn’t happen
—>—>—>—>—>—>—>—>—>—>
THE OUTFIT
I buy purple tights from amazon, and an XL lime green shirt from michael’s which just so luckily perfectly matches my head fabric color! (i know guys. i didn’t want to buy sweatshop clothes for this cosplay but it was all i could do..)
i get a 1&1/2in. thickness plumbing foam tube and glue it into a circle for the base of the shirt, which i paint dark greeeen. i fabric glue the shirt bottom to the foam circle and realize that that won’t hold it well enough, so i grab 10 or so sewing pins and stick them through the shirt and foam from the inside (works wonders)!!
AND WITH THAT. we. are. DONE!
I go to saboten con.. and oh wow do i enjoy myself?!?!??! umm yes yes i DOOO!! i have the absolutes blast of blasts. also i went with a couple friends, one of which i was really excited to see and hadn’t seen in a year or so, and it was super amazing and lovely and not awkward to hang out with them for hours and hours! we left at 11pm hehehheee..

—my friend is the kokichi—
it was a super amazing experience and i had so much funヽ(´∇`)ノthank you and shoutout to everyone who asked for a picture or complimented me or hummed a little katamari-nahnah while walking past, the community made it such an even more wonderful rewarding night :’]
until next time!

 But regardless, it turned out pretty well!! From here,